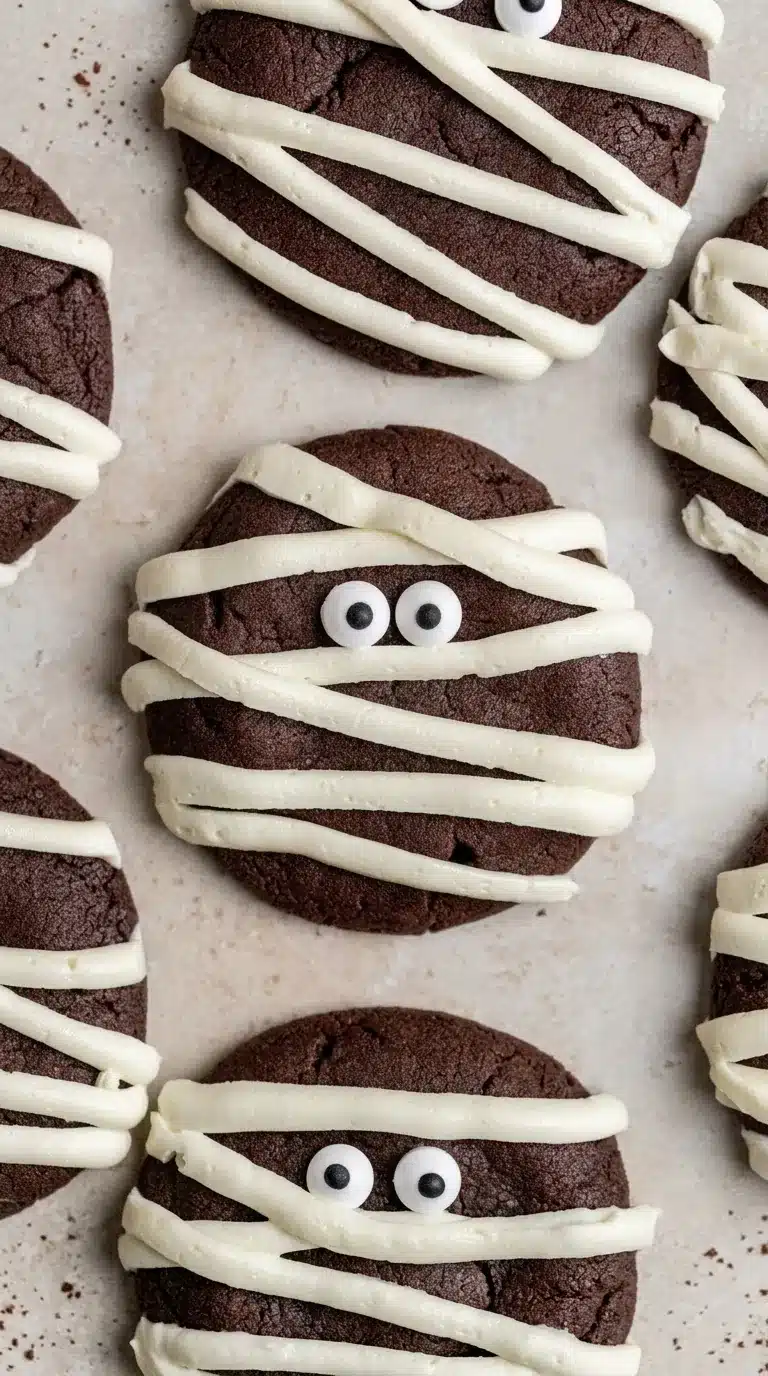
Halloween Mummy Cookies bring a little spooky fun straight to the cookie tray. These soft, fudgy chocolate cookies get creamy vanilla buttercream bandages and silly candy eyes. Better yet, the recipe makes 14 cookies, so you have plenty for Halloween parties, family baking nights, or a sweet spooky season treat.
Table of Contents
Why You’ll Love These Halloween Mummy Cookies
These Halloween Mummy Cookies combine rich chocolate flavor with a playful design. Plus, the decorating looks impressive without requiring tricky piping skills.
Soft and Fudgy Chocolate Texture
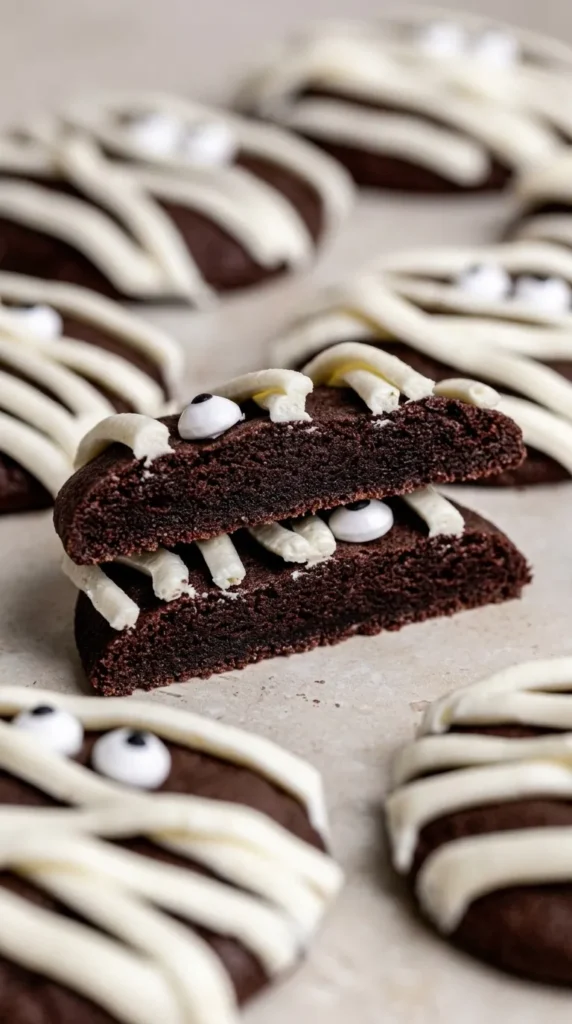
Dark brown sugar and melted butter give each cookie a soft, chewy center. Meanwhile, cocoa powder adds a deep chocolate flavor that works beautifully with sweet vanilla frosting.
Easy and Fun Mummy Decoration
You only need buttercream, a piping bag, and candy eyes. Then, a few quick frosting lines turn plain chocolate cookies into tiny mummies.
Perfect for Halloween Parties and Kids
Kids can help add the eyes and pipe the bandages. Also, the finished cookies look cute on party trays, dessert tables, and Halloween treat plates.
Ingredients for Halloween Mummy Cookies
This recipe makes 14 cookies. Each cookie uses about 55 g, or roughly 2 ounces, of dough.
Chocolate Cookie Ingredients
Use 150 g butter, 200 g granulated sugar, 50 g dark brown sugar, 1 egg, 1 egg yolk, and 1 teaspoon vanilla extract.
Then, add 260 g all purpose flour, 40 g cocoa powder, ¾ teaspoon baking powder, ¾ teaspoon baking soda, and ¾ teaspoon salt.
Vanilla Buttercream Ingredients
You need 80 g powdered sugar, 50 g room temperature butter, ½ teaspoon vanilla extract, and 1½ teaspoons milk.
Candy Eyes and Decorating Supplies
Keep candy eyes nearby for each mummy face. Also, grab a piping bag and parchment paper before you start.
Ingredient Notes and Baking Tips
A few small ingredient choices make a noticeable difference in these Halloween Mummy Cookies.
Why Dutch-Process Cocoa Works Well
Dutch process cocoa gives the cookies a darker color and richer chocolate taste. Therefore, it creates a bold base for the pale buttercream bandages.
How Dark Brown Sugar Keeps the Cookies Soft
Dark brown sugar adds moisture and a warm molasses note. As a result, the centers stay softer and chewier.
Why Weighing Ingredients Gives Better Results
For reliable baking, weigh your ingredients in grams. In fact, a kitchen scale gives you much more control than loosely filled measuring cups.
How to Make Halloween Mummy Cookies
The listed prep time is 20 minutes, while baking takes about 10 minutes per tray. However, allow extra time for chilling and cooling.
Melt and Cool the Butter
Gently melt 150 g butter in a microwave or saucepan. Do not let it bubble.
Next, pour it into a large bowl and chill it for about 20 minutes until it reaches room temperature.
Mix the Wet Ingredients
Add both sugars to the cooled butter and mix for about 1 minute. Then, add the egg, egg yolk, and vanilla.
Mix just until everything comes together.
Add the Dry Ingredients
In another bowl, stir together the flour, cocoa, baking powder, baking soda, and salt.
Next, fold the dry ingredients into the wet mixture. Stop as soon as the dough forms.
Chill and Portion the Cookie Dough
Refrigerate the dough for 30 minutes. Meanwhile, heat a conventional oven to 350°F, or 175°C, and line a baking sheet with parchment.
Then, portion about 55 g or ¼ cup of dough per cookie. Roll each portion into a ball and flatten it gently to about 0.8 inch thick.
Bake the Chocolate Cookies
Place six cookies on each tray. Then, bake one tray at a time for 9 to 10 minutes.
The cookies will feel soft when you remove them. Therefore, leave them on the tray for 3 minutes before moving them to a cooling rack.
Make the Vanilla Buttercream
Beat the powdered sugar, butter, vanilla, and milk on high speed for about 3 minutes.
Next, stir the frosting briefly with a spatula. This step removes some larger air bubbles and gives you smoother piping.
Decorate the Cookies Like Mummies
Transfer the buttercream to a piping bag and cut a hole about 5 mm wide.
First, attach two candy eyes with tiny dots of frosting. Then, pipe loose strips across each cookie until your mummy takes shape.

Tips for the Best Mummy Cookies
A few simple habits will help your Halloween Mummy Cookies stay thick, soft, and neat.
Avoid Overmixing the Dough
Stop mixing once you no longer see dry flour. Otherwise, extra mixing can make the texture firmer than you want.
Keep Unbaked Dough Chilled Between Batches
Return unused dough to the refrigerator while each tray bakes. As a result, the butter stays cool and the cookies hold their shape better.
Let the Cookies Cool Completely Before Decorating
Warm cookies can melt buttercream quickly. Therefore, wait until every cookie feels completely cool before you add the mummy design.
How to Pipe Easy Mummy Bandages
Move your piping bag from side to side and let the lines cross at different angles. In fact, slightly uneven strips make the mummies look more playful.
Make-Ahead and Freezing Instructions
You can prepare the dough early when Halloween week gets busy.
Refrigerating Cookie Dough Overnight
Portion the dough into balls and place them in an airtight container. Then, refrigerate them overnight and bake them according to the recipe.
Freezing and Thawing Cookie Dough
Freeze portioned dough balls in an airtight container or freezer bag for up to 30 days.
Then, thaw them for about 1 hour before baking. After that, shape and bake them as usual.
How to Store Halloween Mummy Cookies
Store finished cookies only after the frosting settles and the cookies cool fully.
Keeping the Cookies Soft and Fresh
Place the cookies in an airtight container at room temperature. For the softest texture, enjoy them within 1 day.
Each cookie contains an estimated 278 calories, 40 g carbohydrates, 2 g protein, and 13 g fat. It also contains about 25 g sugar and 325 mg sodium.
For more Halloween baking ideas and seasonal kitchen inspiration, you can also follow Kai Recipes on Pinterest and Kai Recipes on Facebook.
Frequently Asked Questions
Can I make Halloween Mummy Cookies ahead of time?
Yes. You can refrigerate portioned dough overnight. Also, you can freeze dough balls for up to 30 days and thaw them for about 1 hour before baking.
Can I use regular cocoa powder instead of Dutch process cocoa?
Yes, although Dutch process cocoa gives these cookies a richer flavor and darker color. If you have it available, it works especially well here.
Why do my cookies still look soft after baking?
That soft appearance means you are on the right track. Let the cookies sit on the hot baking sheet for 3 minutes, and then move them to a cooling rack.
Can kids decorate these mummy cookies?
Absolutely. Kids can add candy eyes and pipe simple frosting strips. However, an adult can handle the hot trays and oven.
More Such Recipes
- Halloween sugar cookies with colorful pinwheel swirls
- rich Halloween Oreo chocolate cookies
- easy Halloween chocolate chip cookies with candy eyes
- spooky peanut butter spider cookies
- Hocus Pocus Halloween cookies with gooey frosting
- easy cauldron cookies with green buttercream and candy eyes
Final Thoughts
Halloween Mummy Cookies turn a rich chocolate cookie into a dessert that feels made for spooky season. The fudgy centers, sweet vanilla buttercream, and funny candy eyes bring plenty of character without complicated decorating.
So, bake a batch with the family, set them out for a party, or save a few for an October movie night. Either way, those little buttercream mummies tend to disappear quickly.

Halloween Mummy Cookies With Vanilla Buttercream
Description
Soft, fudgy Halloween Mummy Cookies made with rich chocolate cookie dough, creamy vanilla buttercream, and candy eyes. These fun spooky cookies make an easy Halloween dessert for parties, family baking, and seasonal treats.
Ingredients
- Chocolate Cookies:
- 150 g butter
- 200 g granulated sugar
- 50 g dark brown sugar
- 1 egg
- 1 egg yolk
- 1 teaspoon vanilla extract
- 260 g all-purpose flour
- 40 g cocoa powder, preferably Dutch-process
- ¾ teaspoon baking powder
- ¾ teaspoon baking soda
- ¾ teaspoon salt
- Vanilla Buttercream:
- 80 g powdered sugar
- 50 g butter, room temperature
- ½ teaspoon vanilla extract
- 1½ teaspoons milk
- Decoration:
- Candy eyes, as needed
Instructions
- Melt the butter gently in the microwave or in a saucepan. Do not let it bubble.
- Transfer the melted butter to a large mixing bowl and chill for about 20 minutes, until it reaches room temperature.
- Add the granulated sugar and dark brown sugar. Mix for about 1 minute.
- Add the egg, egg yolk, and vanilla extract. Mix until combined.
- In a separate bowl, combine the all-purpose flour, cocoa powder, baking powder, baking soda, and salt.
- Fold the dry ingredients into the wet ingredients just until a dough forms. Do not overmix.
- Refrigerate the cookie dough for 30 minutes.
- Meanwhile, preheat a conventional oven to 175°C or 350°F and line a baking sheet with parchment paper.
- Portion about 55 g, 2 oz, or ¼ cup of dough for each cookie.
- Roll each portion into a ball, place it on the prepared tray, and gently flatten it to about 2 cm or 0.8 inch thick.
- Arrange 6 cookies per tray and bake one tray at a time for 9 to 10 minutes. Keep the remaining unbaked dough refrigerated.
- Let the baked cookies rest on the baking sheet for 3 minutes.
- Transfer the cookies to a cooling rack and let them cool completely.
- To make the buttercream, beat the powdered sugar, room-temperature butter, vanilla extract, and milk on high speed for about 3 minutes.
- Stir the buttercream briefly with a spatula to reduce air bubbles.
- Transfer the buttercream to a piping bag and cut an opening about 5 mm or 0.2 inch wide.
- Attach the candy eyes to each cooled cookie with a small dab of buttercream.
- Pipe buttercream strips across each cookie to create the mummy bandage design.
Notes
For the most accurate baking results, weigh ingredients in grams rather than relying on cup measurements.
Dutch-process cocoa powder works well for a richer chocolate flavor.
Pure vanilla extract gives the best vanilla flavor.
Dark brown sugar adds moisture and helps create a softer, chewier texture.
Avoid overmixing after adding the flour mixture.
Keep the remaining dough refrigerated while each batch bakes.
The cookies will still feel soft when they leave the oven, so let them firm on the baking sheet for 3 minutes before transferring them.
You can portion the cookie dough into balls and refrigerate them in an airtight container overnight, then bake as directed.
You can freeze dough balls in an airtight container or freezer bag for up to 30 days.
Thaw frozen dough balls for about 1 hour before baking.
Store finished cookies in an airtight container.
For the best texture, eat the finished cookies within 1 day.
The listed total time is 30 minutes and does not include the additional chilling and cooling periods.